1 yard of patterned fabric (I suggest a polka dot-type pattern so it looks like suction cups)
1 medium piece of black felt, 1 medium piece of white felt (for the eyes)
white thread, black thread and thread of the same color as the felt you’re using
pins
about 5 lbs. of stuffing
a couple big sheets of paper to draw your pattern
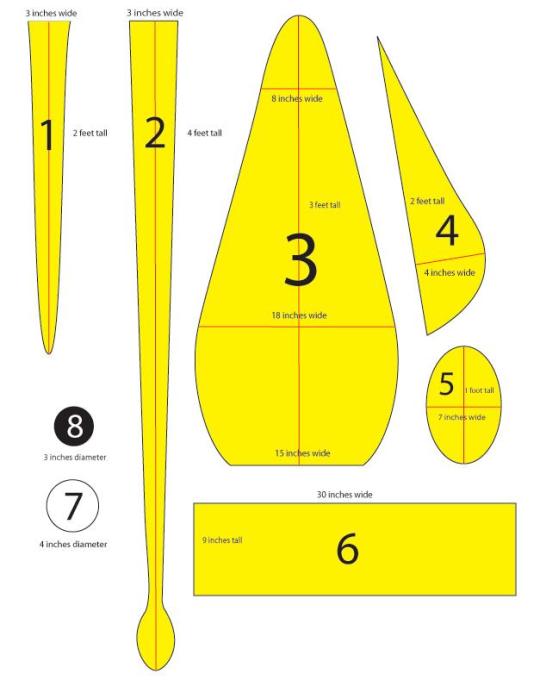
First, you need to draw out your patterns. Here’s a basic template to get you started, although most of the measurements are reasonably fudgeable. If in the likely event you don’t have any four-foot-long pieces of paper lying around, just tape a few pieces together.
Once you’ve drawn out your eight patterns, it’s time to cut the fabric. Pin the pattern to the fabric, laid flat, and cut out the following, leaving a half an inch or so of extra fabric around the edge of the pattern:
FOR THE ARMS: 8 felt and 8 fabric cutouts of piece 1
FOR THE, UH, LONGER ARMS: 2 felt and 2 fabric cutouts of piece 2
FOR THE BODY: 2 felt cutouts of piece 3
FOR THE FIN: 4 felt cutouts of piece 4
FOR THE HEAD: 1 felt cutouts of piece 6
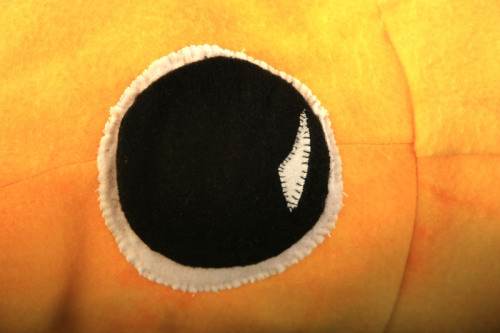
FOR THE EYES: 2 white felt cutouts of piece 7 and 2 black felt cutouts of piece 8
So now you’ve got all your pieces ready, it’s time to start sewing them together. I did mine by hand because my sewing machine is busted and I get a kind of Zen buzz from sewing by hand, but if you have a non-busted one I recommend that you use it as it will be MUCH EASIER. You’re going to be sewing everything with the nice side of the fabric facing in, then turning it inside out to stuff it.
THE ARMS: (To make a quilted pattern that looks like suckers, see this other post). Pin together one patterned fabric piece 1 and one felt piece 1 (with the nice sides facing the inside). Sew down around the U-shape and back up, leaving the top open. Then turn the arm inside out, stuff it (it’s easiest to do both of these things if you sort of scrunch it up like you’re trying to put on a pair of tights, excuse the non-dude-friendly reference) and sew the top closed. Do the same for the other seven arms and rejoice in the fact that this is the most tedious part. Same deal with the two long arms, they’re just harder to stuff.
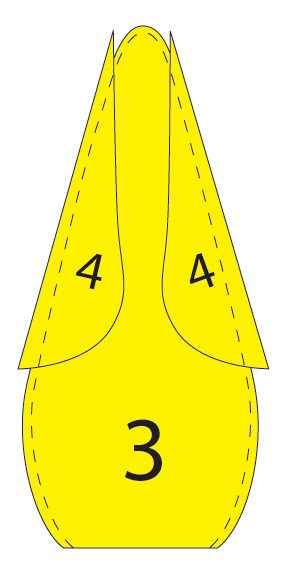
THE FINS: Pin together two of your piece 4s and sew together the curvy outer edge. Turn the piece inside out, so the seam you just sewed is on the inside, and start sewing up the other side, stuffing gradually as you go along. You should end up with a triangle-ish puffy thing. Repeat for the other two piece 4s.
THE BODY: Put down one piece 3, then place the two fins you have down with the point up and the curvy side pointing in, then make a sandwich by putting the other piece 3 down on top. Pin it all together and sew around the edges with the two fins still inside, as shown. Turn it inside out and move on to…
THE HEAD: So take piece 6 and the ten arms you’ve already done. Lay the arms, fabric side facing you, out with the arms’ top seams in a line half an inch from the top of piece 6. The order should be arm arm arm arm BIG ARM arm arm arm arm BIG ARM. The legs should be almost entirely covering piece 6. Pin them in place and sew a straight line through the individual legs seams to attach the legs to piece 6.
When you pick up the other side of piece 6, you now have something resembling a really weird untied hula skirt. Sew together the two 9-inch ends of piece 6 with the fabric side of the arms on the outside, and keep it inside out for the moment.
PUTTING IT ALL TOGETHER: Fit the open end of the body through the arms (still fabric side facing out) and pull the edge all the way through the felt cylinder so it’s even with the edge that DOESN’T have arms attached to it. Sew around the diameters of the head cylinder and the body cylinder to attach them, then pull the legs down over the head and you’re almost done!
Stuff the body, then seal it off by sewing piece 5 over the open end (even if you do have a functional sewing machine, you’ll probably have to do this part by hand).
THE EYES: Sew the black circles on the white circles and whipstitch the eyes onto the head. You do this last because you can’t tell where they’re going to end up on the end product if you put them on before stuffing the body.
Everyone will adore these cuddly plush stuffed dragons that sit perfectly well-behaved on your shoulder. Pattern includes options of a mane, wings and or spikes to add to your basic dragon if you choose. Simplicity sewing pattern.
Why do my interests in canning, couponing, and homesteading overlap so often with blogs with titles like ‘The Obedient Housewife’?
Like, I’m like, “I want to learn to make soap and farm,” and suddenly I see 500 “traditional family” motherfuckers like no you are mistaken. I am just a simple lesbian anticapitalist looking to limit my consumerism as much as possible.
‘these fun crafts will keep your kids occupied until your husband gets home!’ no i want a clothespin crown for me
As a nerd who homesteads, let me share the data I have gathered!
First is my megalist of homesteading-related links I’ve gathered over the years. I’m a mod over at r/homesteading and this is where I’ve put a lot of good sources (not all, admittedly some are still sitting in my bookmark folder waiting to be added). The search function at reddit is wretched, but there’s also been lots of good things I’ve shared there too. Please note that many of these sources are not actual webpages, but PDFs. That’s not an accident, PDFs are where you find the really good in-depth stuff.
Many of my sources are from the Extension Service. They won’t try to relate to you based on your lifestyle or sexual identity or religion or whatever, but due to that, they also won’t be alienating you either.
The Cooperative Extension Service (US only) exists in all 50 states and in most counties. It is taxpayer funded. The Extension Service exists to help people become more self sufficient, for farmers to be more successful, for people to be healthier, for kids to be well adjusted, to figure out how to grow the best plants in your area, etc. Some county offices even offer cheap classes in things like gardening, canning, soap making, and they’re taught by people with training in these areas (I once heard a great talk on composting from a soil scientist that way). Do you want to know what type of plant something is? Do you need help figuring out a plant disease or pest issue? You can now contact them online and get great info.
I HIGHLY recommend checking out your state’s extension service website, because they do offer different types of information, depending on what is grown/raised where you are (and how well funded they are). My county extension puts out a monthly gardening newsletter, which includes a helpful ‘this is the time of the year to do —-’ part.
Here’s an example from New York – they have a calendar at the bottom, showing how they have things like hydroponic and urban agriculture workshops coming up.
Interested in raising animals? Penn State Extension is really really good. They have tons of free materials and courses available online, some I pulled for my megalist at the top of this.
National Center for Home Food Preservation – they cover the important aspects of food safety, and also have some recipes. Many state Extension Service websites will have lots more recipes.
If you have kids, check out4-H programs for them. It’s part of the local public school system here. If you’re homeschooling, you can also purchase their science-filled educational and self sufficiency materials (materials are divided by age ranges – Cloverbud Member: ages 5-8, Junior Member: ages 9-13, Senior Member: ages 14-19). One of my coworkers is in 4-H, she’s still in high school, and last year she raised an award-winning heifer.
Congress grants the money for funding these programs, and they’re connected with various universities. There’s a level of cutting edge scientific knowledge and academic rigor you don’t find in blogs or even most books. There’s LOTS of homesteading books filled with outdated information like ‘till the earth every year’ hell I still have older coworkers who do it and I’m trying to figure out how to gently tell them that they’re destroying their soil that way, and that there’s better methods now, methods grounded in science.